Showing posts with label nest. Show all posts

Friday, August 10, 2012

Altered Notepad Frame

Nap Time CreationsWhew!  It has really been raining lately!  I have had this project planned, but
needed to wait for the rain to stop so I could spray paint.  Today, the sun was
out and I grabbed my frame and spray paint box and ran outside.  I sprayed
my frame and came back inside to set up the rest of the project.  After about 
20 minutes, I decided to see if the frame was dry.... wouldn't you know it...
the sun was shining and it was raining!  That's Florida weather for you!

Anyway, my frame had dried enough that the rain didn't ruin it.  I grabbed it
quickly and came inside to start this long awaited project.

Here are the pics and how I did it.


I sprayed my frame white and rescued it from the rain!  Then after it dried, I
applied a layer of Mod Podge so the paint would look thicker (and older) 
when I sanded it.  Then when it was nearly dry, I applied a heavy layer
of acrylic paint.  I don't know why I am on a kick for turquoise right now.


I sanded down the frame outside (after it stopped raining).


Then I applied a layer of Mod Podge to the back of the frame and laid the burlap 
on top.  I applied more Mod Podge on top of the burlap and two pieces of ribbon.


Okay.... I have to give you a warning here!

To apply this cute little nest with eggs (that I found on sale at Target),
I decided to use super glue.  Do NOT use super glue!   It is not heavy
enough and you will end up using a different adhesive anyway.

In MY particular case, I used a hot glue gun.... thereby HEATING 
the super glue, which in turn created horrible fumes 
that burned my nose and throat (for hours!).  

Consider yourself warned!  


I created this cute little notepad on Adobe Photoshop.
(Have I mentioned that I {L O V E} Adobe Photoshop?

I typed the word "Nest" and the definition at the bottom and I found
this little bird picture when I searched bird clipart.


To make the notepad, I printed the paper I wanted in the pad and then 
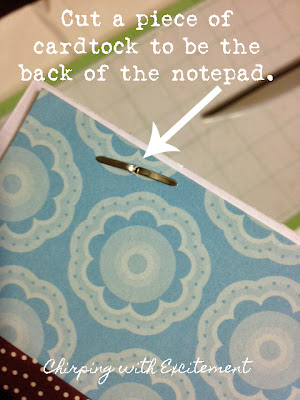
used two brads on each side of the notepad.  I cut a piece of card stock 
(I used a piece with a print so you would be able to see it better) to use as
the back of the notepad.  Cut the card stock slightly smaller than the
size of the notepad.  You can see how I did that.

(...and I misspelled card stock on my photo... oh, the horrors!)


This part is a little tricky.  I hope I can explain it well enough.
I took a piece of twine and wrapped it around the back of the frame (the part
to which the burlap is Mod Podged).  Then, I hot glued it to the back.
In other words, if I flipped this frame around and you saw the back
of it, you would see the twine and the hot glue. . . (the ugly truth!)


I did that so that I would be able to slip the back of the notepad behind the twine so it would 
stay until I need to add more paper to my note pad.  At that point, I could easily 
remove it and add more paper to the brads and then replace it again.


Check it out!  I added a clothespin! Imagine that.... me... using a clothespin!  :-)
I hot glued the clothespin to the burlap so I could change the 
monthly calendar out when the month changes.


I also created this little calendar on Adobe Photoshop.
I used the same background on the calendar that I used on 
the notepad.  This way they coordinate! :-)


Here is the finished project.


I hope you enjoyed this project.  Maybe it will inspire you to 
create your own notepad and calendar frame.  

I'm hoping to hang this in my classroom (when I get one)!  

If you have a minute, I would {L O V E} for you to let me know what you think.
I love comments!  I'd also {L O V E} for you to follow my blog via Google Friend.

Until next time, be blessed!

:-)  Tonya

While you're here, check out my older posts.....


Linking to these parties...


Friday, July 20, 2012

Altered Pail (Salvation Army Find)

Maybe you remember the tin pail that I found at the Salvation Army for $0.69 that I wanted to repurpose.  Click here to see that post.  Well, here is the finished project and the pictures that will walk you through the process.  Hope it inspires you!


First I took out (most of) my supplies (later I decided to add more to it!).


The first thing I did was rub some of my paint onto the pail to give it a weathered look.


Then I cut out a strip of burlap and applied a heavy layer of Mod Podge to my can and 
placed the burlap onto the Mod Podge.  I then put Mod Podge on top of the burlap and cut two
 different pieces of scrapbook paper to layer on top (doing the same thing with the Mod Podge).  
The pages were thicker and I had to hold them into place to make sure they didn't come up while 
they were drying.  So, this took about 3 minutes per piece.  Not too bad, I didn't think.  
I had my mother-in-law over so we were chatting while I was holding the paper in place!  :-)


When it dried enough to let go, I added a wooden number 7 (because I love the number 7... I actually love most numbers...typography is awesome!)  I got the wooden number from my local craft store.
I applied a heavy amount of Mod Podge and held it in place for another 3 minutes 
while I continued my conversation! Lol!  After it dried enough to let go of, I just let it sit 
for about 10 minutes while I gathered the items I wanted to use to place inside of the pail. 


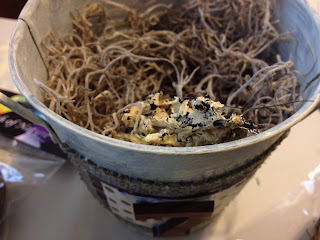
I used spanish moss and put it almost to the top.  Later I went back and added more, 
so I should have just gone all the way to the top with it to begin with.


I added a nest that had little eggs.  I got a few of these at my local craft store because I 
L-O-V-E
to add bird elements to my creations!  
This little nest has some feathers in it, which I adore!


Tim Holtz produces one of my favorite lines of scrapbook and crafting elements.
I have been trying to find a reason to use this!  So, I decided not to waste any of the product, and I cut the little sample number 7 from the package and use it in the nest.  


I also dabble in jewelry making so I had some little elements that I wanted to add.  I had the little corked bottle with a number 97 on it and some seed beads inside that I thought would look cute in the nest, so I used that and a little key charm and a few small buttons.  I also had some of my favorite alphabet twill that I place inside.  Something was still missing.  I needed an element of bling! What could I add?


I found a little spacer that had blue rhinestones.  Perfect!
So, I slid it onto a piece of spanish moss so it wouldn't fall to the bottom.


Here is another view.


I didn't like the twill just "laying there", so I added
a safety pin as another element


Then, I added twine to the top of the pail and added an old button and a 
wooden bead hanging down from the twine.  I knotted the end of the twine so it would stay.


Okay, here it is finished.


Let me know what you think.  I'd love to here from you.

Until next time, be blessed!

:-) Tonya


Saturday, July 14, 2012

Glass Jar Project

Okay, so today I took the glass jar that I purchased from the Salvation Army (from Thursday's post) and I "fixed it up".  First I washed the jar (that was a must!).  Then I gathered my supplies.  I used spanish moss, a small bird's nest and a couple of plastic eggs, some twigs from my yard, a tiny clothes pin, and some twine.

Here are my step-by-step pictures so you can see how I put it together.


Oh, I forgot to mention my old hymnal that I found at an antique store.  I use this hymnal often 
as it has come in handy for many projects.  I shred a page in the hymnal to add to the project.

I added some spanish moss to the empty jar and then I added the shredded music page.
Then, I placed the nest inside.  See the little feathers inside the nest?  I thought that was cool!


I added twigs to the jar and then I used a small piece of twine 
and tied 2 of the twigs together.  


I wanted to add a little something special, so I typed (Times Roman font)
a flashcard and printed it on cream colored card stock. 


I cut it out and rounded the corners to make it look "authentic".
I clipped it onto one of the twigs with my tiny clothespins.  


Then, I put the lid on and viola!  


I just have to choose the best place for it to rest....


?

Anyway, that's one of my Salvation Army finds that I have made over.
Now to get busy on the others!

Until next time, be blessed!

:-) Tonya 


* P.S. - I linked this post to Tatertots and Jello Weekend Wrap Up Party and to Shabby Nest  and Homestead Simple.


RETURN TO TOP