Showing posts with label Altered frame. Show all posts

Friday, August 10, 2012

Altered Notepad Frame

Nap Time CreationsWhew!  It has really been raining lately!  I have had this project planned, but
needed to wait for the rain to stop so I could spray paint.  Today, the sun was
out and I grabbed my frame and spray paint box and ran outside.  I sprayed
my frame and came back inside to set up the rest of the project.  After about 
20 minutes, I decided to see if the frame was dry.... wouldn't you know it...
the sun was shining and it was raining!  That's Florida weather for you!

Anyway, my frame had dried enough that the rain didn't ruin it.  I grabbed it
quickly and came inside to start this long awaited project.

Here are the pics and how I did it.


I sprayed my frame white and rescued it from the rain!  Then after it dried, I
applied a layer of Mod Podge so the paint would look thicker (and older) 
when I sanded it.  Then when it was nearly dry, I applied a heavy layer
of acrylic paint.  I don't know why I am on a kick for turquoise right now.


I sanded down the frame outside (after it stopped raining).


Then I applied a layer of Mod Podge to the back of the frame and laid the burlap 
on top.  I applied more Mod Podge on top of the burlap and two pieces of ribbon.


Okay.... I have to give you a warning here!

To apply this cute little nest with eggs (that I found on sale at Target),
I decided to use super glue.  Do NOT use super glue!   It is not heavy
enough and you will end up using a different adhesive anyway.

In MY particular case, I used a hot glue gun.... thereby HEATING 
the super glue, which in turn created horrible fumes 
that burned my nose and throat (for hours!).  

Consider yourself warned!  


I created this cute little notepad on Adobe Photoshop.
(Have I mentioned that I {L O V E} Adobe Photoshop?

I typed the word "Nest" and the definition at the bottom and I found
this little bird picture when I searched bird clipart.


To make the notepad, I printed the paper I wanted in the pad and then 
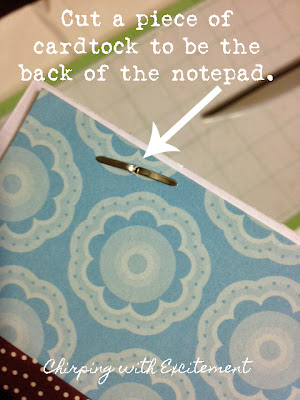
used two brads on each side of the notepad.  I cut a piece of card stock 
(I used a piece with a print so you would be able to see it better) to use as
the back of the notepad.  Cut the card stock slightly smaller than the
size of the notepad.  You can see how I did that.

(...and I misspelled card stock on my photo... oh, the horrors!)


This part is a little tricky.  I hope I can explain it well enough.
I took a piece of twine and wrapped it around the back of the frame (the part
to which the burlap is Mod Podged).  Then, I hot glued it to the back.
In other words, if I flipped this frame around and you saw the back
of it, you would see the twine and the hot glue. . . (the ugly truth!)


I did that so that I would be able to slip the back of the notepad behind the twine so it would 
stay until I need to add more paper to my note pad.  At that point, I could easily 
remove it and add more paper to the brads and then replace it again.


Check it out!  I added a clothespin! Imagine that.... me... using a clothespin!  :-)
I hot glued the clothespin to the burlap so I could change the 
monthly calendar out when the month changes.


I also created this little calendar on Adobe Photoshop.
I used the same background on the calendar that I used on 
the notepad.  This way they coordinate! :-)


Here is the finished project.


I hope you enjoyed this project.  Maybe it will inspire you to 
create your own notepad and calendar frame.  

I'm hoping to hang this in my classroom (when I get one)!  

If you have a minute, I would {L O V E} for you to let me know what you think.
I love comments!  I'd also {L O V E} for you to follow my blog via Google Friend.

Until next time, be blessed!

:-)  Tonya

While you're here, check out my older posts.....


Linking to these parties...


Saturday, August 4, 2012

Numbered Frame Project

I wanted to do something with numbers, frames, burlap and Mod Podge, so...
 I gave myself a challenge to see what I could do and this is what I came up with.

This project is fairly easy, but it took quite a bit of drying time, so if you plan to do 
this project you will need to plan ahead.  Here are the pics and how the project came along.


Other than the supplies listed above, I used scrapbook paper, pages from my
hymnal, 2 frames (one smaller than the other)- I used a silver frame and a 
black frame, white spray paint, acrylic paints, twine, my trusty Tim Holtz 
embellishments, heavy duty crafting glue (E6000) and 
an exacto knife and self-healing cutting mat.

Take the back off of the largest frame.


While that is drying, I moved on to the spray painting.
Make sure you are in a ventilated area (like outside).


While that was drying, I starting tearing the papers that I wanted.
Torn edges give it a nicer look than cut edges.  For the layers that
I knew would be covered, there was no need to tear the pages, though.


This is the frame after all of the papers were Mod Podged on.

Believe it or not, even after this dried, my spray painted 
frame was STILL not dry!


I wanted it to have a shabby chic look, so I added paint.... but, I did not Mod Podge the
top layers because I wanted the paint to be able to stick to the paper.  In doing this, you will need to
work fast though... otherwise the paper will absorb the paint (giving you less time to work).


I added a cream color as the base and then applied some teal color streaks 
here and there.  I definitely wanted my numbers to show through, so I made sure 
that I worked quickly in the areas where the numbers were.  

I had a hymnal page number at the top of the frame that I wanted to 
show through and there was also the number 17 at the bottom.

You can see both of those here.


And of course I wanted my hymnal pages to show!


I made some outlines of the frame here and there with more acrylic paint.


Next, I had to layer some papers to create the center portion of the piece.
By this time, my (smaller) white frame was dry, so I brushed on an acrylic color that I liked.


Here it is stacked together and wrapped in twine. 

It is at this point that you may need to take the stand from the back of
your smaller frame so you can adhere it to the burlap (on the larger frame).

Add a "healthy portion" of E6000 or whatever your 
trusted heavy-duty crafting glue is.

Hold it down and let it dry. (Make sure the paint from the frame is 
completely dry before you do this, or it will make a mess)!  ;-)


Here it is sitting up... all finished!

Once you feel confident that it is dry and well adhered, hang it 
in your favorite spot on the wall and enjoy!


I hope this inspires you to challenge yourself to use materials that
you love, but may have stashed away!  Use what you love!

Please leave me a comment and tell me what you think!
I would absolutely {L O V E} to hear from you!

.... and if you have an extra minute, I would {L O V E} for you to 
join my site through email or Google Friend (on the sidebar)!

Until next time, be blessed!

:-) Tonya


Wednesday, July 18, 2012

Dry Erase Altered Frame

I am getting in just under the wire to make my post for Wednesday!  I have had a busy day today.  I went to several antique shops and picked up some great little finds (I will post those pictures later).  My son was away for the first half of this summer and he came back today, so I spend some quality time visiting with him.

Anyway, for this post, I decided to take a cheap $5 Wal-Mart frame and see what I could do with it.  I gathered some materials and decided that I would antique the frame and add a piece of scrapbook paper and use the glass as a dry erase board for quick messages.

This thought came to me yesterday when I was erasing a plate that I keep in my kitchen that I use as a dry erase "Menu".   (I will post pictures of that later, too).

Anyway, here are pictures of the process.


I gathered my supplies.  Scrapbook paper for the background, Vaseline (any petroleum jelly should do) and Q-tips for dabbing the frame in certain areas, paint, my handy-dandy paper cutter, twine, embellishments, a paint brush and a sponge brush.


First, I took the glass and the paper out of the frame.  I don't mind if the paint gets on the inside of the frame that no one will see, but I didn't want it on the glass.  I also used the paper inside of the frame to cut the scrapbook paper to the right size.  


I daubed the Vaseline on the frame very strategically in spots where I thought the paint would have chipped if it really was an antique frame.  Then I applied the paint DIRECTLY to my sponge....not to the frame itself, and I daubed the sponge onto the frame (do not wipe it, you will smear the Vaseline).

I put a good coat on and then I waited for it to dry.


If the paint didn't cover some of the cracks, I thought that 
was okay, because it only added to the charm.


After the paint dried, I used a paper towel to GENTLY wipe the frame.  
The areas with the Vaseline underneath the paint wiped off, leaving behind the
frame.  It looks like the paint actually chipped off.


I wiped a line of the Vaseline down the frame on each side, so you can see where the 
dark lines are on the frames (making it look like it was more dimensional).

The frame I got had a little gold on it and I didn't want the gold to show through (because I wanted it to look like a wooden frame), so I used a second color to touch up some of the areas that had gold showing through.  I touched the frame with the blue and then just wiped it a little so it would stand out too much.


I used a small paintbrush so I could control the paint better.


You can see where I added the blue to this corner.

Here is the frame after all of the blue has been added.


It looked a little plain, so I added a little embellishment across the top.


Here it is with the embellishment.


Tell me what you think.

Hope you enjoyed this post.

Maybe it will inspire you.

Until next time, be blessed.

:-) Tonya

* P.S. - I linked this post up to House of Hepworths #108 and The Shabby Nest 


RETURN TO TOP