Showing posts with label Bird. Show all posts

Friday, August 10, 2012

Altered Notepad Frame

Nap Time CreationsWhew!  It has really been raining lately!  I have had this project planned, but
needed to wait for the rain to stop so I could spray paint.  Today, the sun was
out and I grabbed my frame and spray paint box and ran outside.  I sprayed
my frame and came back inside to set up the rest of the project.  After about 
20 minutes, I decided to see if the frame was dry.... wouldn't you know it...
the sun was shining and it was raining!  That's Florida weather for you!

Anyway, my frame had dried enough that the rain didn't ruin it.  I grabbed it
quickly and came inside to start this long awaited project.

Here are the pics and how I did it.


I sprayed my frame white and rescued it from the rain!  Then after it dried, I
applied a layer of Mod Podge so the paint would look thicker (and older) 
when I sanded it.  Then when it was nearly dry, I applied a heavy layer
of acrylic paint.  I don't know why I am on a kick for turquoise right now.


I sanded down the frame outside (after it stopped raining).


Then I applied a layer of Mod Podge to the back of the frame and laid the burlap 
on top.  I applied more Mod Podge on top of the burlap and two pieces of ribbon.


Okay.... I have to give you a warning here!

To apply this cute little nest with eggs (that I found on sale at Target),
I decided to use super glue.  Do NOT use super glue!   It is not heavy
enough and you will end up using a different adhesive anyway.

In MY particular case, I used a hot glue gun.... thereby HEATING 
the super glue, which in turn created horrible fumes 
that burned my nose and throat (for hours!).  

Consider yourself warned!  


I created this cute little notepad on Adobe Photoshop.
(Have I mentioned that I {L O V E} Adobe Photoshop?

I typed the word "Nest" and the definition at the bottom and I found
this little bird picture when I searched bird clipart.


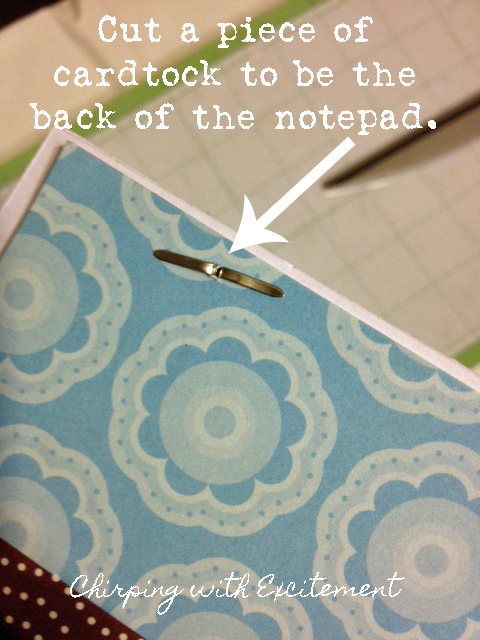
To make the notepad, I printed the paper I wanted in the pad and then 
used two brads on each side of the notepad.  I cut a piece of card stock 
(I used a piece with a print so you would be able to see it better) to use as
the back of the notepad.  Cut the card stock slightly smaller than the
size of the notepad.  You can see how I did that.

(...and I misspelled card stock on my photo... oh, the horrors!)

This part is a little tricky.  I hope I can explain it well enough.
I took a piece of twine and wrapped it around the back of the frame (the part
to which the burlap is Mod Podged).  Then, I hot glued it to the back.
In other words, if I flipped this frame around and you saw the back
of it, you would see the twine and the hot glue. . . (the ugly truth!)


I did that so that I would be able to slip the back of the notepad behind the twine so it would 
stay until I need to add more paper to my note pad.  At that point, I could easily 
remove it and add more paper to the brads and then replace it again.


Check it out!  I added a clothespin! Imagine that.... me... using a clothespin!  :-)
I hot glued the clothespin to the burlap so I could change the 
monthly calendar out when the month changes.


I also created this little calendar on Adobe Photoshop.
I used the same background on the calendar that I used on 
the notepad.  This way they coordinate! :-)


Here is the finished project.


I hope you enjoyed this project.  Maybe it will inspire you to 
create your own notepad and calendar frame.  

I'm hoping to hang this in my classroom (when I get one)!  

If you have a minute, I would {L O V E} for you to let me know what you think.
I love comments!  I'd also {L O V E} for you to follow my blog via Google Friend.

Until next time, be blessed!

:-)  Tonya

While you're here, check out my older posts.....


Linking to these parties...


Tuesday, July 31, 2012

Stitched Bird

Well, this project will go a lot smoother next time!  
I had to make my own pattern... which means a lot of revising!  
I am still not 100% happy with it ... which means I have to make another one!

I want to start making some birds for my classroom and this project
only took a little bit of fabric.  I had some fabric samples recently 
given to me from a friend that I mentioned in a previous post (thanks, Leigh!).

Anyway, here are the pictures of the bird as it progressed.  

After I drew the pattern, I cut it out and then cut my material.  I used a simple stitch and sewed it
to look like it was "inside out" to give it a more vintage feel.


You can see in the next pictures that I cut the tail down significantly! 


And, here it is... finished in my crafting area! 


I have to admit that when I was in Adobe Photoshop, I played with the color.  
I am convinced that my next bird with have to be a black and 
white check.... what do you think?!?! 


I hope this inspires you to use a little creativity and a 
little bit of scrap material to make a cute project.

If you have a minute to type in your email address on the side of my blog,
I would absolutely {L O V E} for you to follow me! :-)

Until next time, be blessed!

:-)  Tonya

*P.S. - I linked this post to The Winthrop Chronicles and In the Old Road


Friday, July 27, 2012

Making a Birdhouse with a Book

I can't take credit for this idea...  
I saw a version close to it at a local art walk last weekend.  I made some changes to it 
(actually, I made a lot of changes...)!  The one I saw used a book for the roof and that's about 
all I kept the same.  I think they used wood for the rest of the house.  I chose to use heavy 
cardboard so it would be light. 


 I plan to use it in my (future) classroom.  

You can see that I incorporated a clothespin! In the classroom, I plan to clip notes there.

So, here are the pictures and how I did it.  
I hope this inspires you to make a project like this from recycled books.


First, I gathered my materials... a book with a lot of ripped pages inside, my paper cutter, Tim Holtz embellishments (of course!), scrapbook paper, scissors, Mod Podge, heavy cardboard (I used a box), a tiny clothespin :-), a large button (from my friend Leigh), a hot glue gun, spanish moss and floral moss.

I cut a template of the front (and back) of the house from white paper and then used it to cut the front 
and back from cardboard.  I then cut the scrapbook paper and Mod Podged it to the cardboard.  
I used a page from the book to Mod Podge to the backside so it would match the book on the top.

After cutting the side walls and covering them with paper, I hot glued the walls
 together and then I hot glued the book to the top.  To hide the "seams", I added the spanish moss 
and floral moss.  Then I added the embellishments like little rhinestones scattered here and there and the Tim Holtz embellishment for the "house number".  I added my tiny clothespin to hold my messages and I added some Spanish moss behind my beautiful button.  Finally, I added a ruler sticker (Tim Holtz) to the bottom to give it more of a classroom look (and because rulers have numbers on them...  and of course you know that I love numbers!)

See the message on the ruler, "Property of Board of Education  City of New York"


View of back with the page from the book.

Side View

This is the book I used.


I love how it turned out! 


So, what do YOU do with old books that have ripped pages?
Don't throw them away.... recycle them for a project!

I hope this inspired you to think of ways to recycle old books.

Please leave me a comment to let me know what you think.
I would really like to hear from you.

If you return to visit my blog, I would {L-O-V-E} for you to become a follower.

Until next time, 

:-) Tonya

* P.S. - I linked this post to Nifty Thrifty and Twigg Studios and 

This post was FEATURED on Destination: Craft


RETURN TO TOP