Showing posts with label Salvation Army. Show all posts

Tuesday, July 24, 2012

Pencil Holder (from Salvation Army Find)

Okay, I picked up the small box that I found from the Salvation Army... remember it from a previous post
Anyway, I decided to make it into a pencil holder.  So, here are the pictures of the process.


I gathered my materials... Mod Podge, paper cutter, Tim Holtz embellishments, 
jute, burlap, scrapbook paper, and of course.... the box!


This is the bottom of the box, but I will use it as the side.
I think this was a small drawer for jewelry before it found its way to
the Salvation Army.  I am going to turn it upright for my project.


I measured my paper and cut it in a strip to fit around the box.  
To make it easier to Mod Podge, I folded the paper around the box 
first so when the time comes to wrap it, it will go on with ease.  
The blue flowered paper you see is actually the backside of the 
paper I am planning to use.  


When I applied the Mod Podge, I sponged it on the box rather than the paper.
I do this because if it is on the paper, it makes it more difficult to make adjustments once 
I lay the paper onto the box.  Also, applying the Mod Podge to the box prevents the 
paper from having wet spots go through (which will cause tears in the paper).


Once that is on, I cut a small rectangle from my second paper choice.
Then I cut an even smaller rectangle from burlap.  I pulled a thread from
each side of the burlap to make it have a fringed look.

Then I took the jute and put it in the holes of my embellishment so 
that the jute would be on the underside of the embellishment.


Once the jute was on the numbered metal plate embellishment, I wrapped it 
around the box and tucked the knot under the embellishment so it would
not be seen.  I applied Mod Podge on the jute (not on the embellishment)
and the burlap and paper once again to make sure it would stay in place.


After that, I wanted to hide the blue inside, so I cut more paper to
fit inside and Mod Podged it into place.


On the inside that would be seen from the front, I applied the same paper that 
I used as the accent paper on the front.  I thought this would make it tie in nicely.


It it still drying here, but you get the idea.


Once, it is dry, add your pencils and pens and display on your desk.

There it is!  

I hope this inspires you to find unconventional items
and transform them into items you love.

Please leave me a comment to let me know what you think.

Until next time, be blessed!

:-)  Tonya

* P.S. - I linked this post to Tip Junkie and {Primp} and Full Circle Creations.

My entry into Thursdays are YOUR Days at 52 Mantels is sponsored by Appliances Online and their Best Freezers!


Friday, July 20, 2012

Altered Pail (Salvation Army Find)

Maybe you remember the tin pail that I found at the Salvation Army for $0.69 that I wanted to repurpose.  Click here to see that post.  Well, here is the finished project and the pictures that will walk you through the process.  Hope it inspires you!


First I took out (most of) my supplies (later I decided to add more to it!).


The first thing I did was rub some of my paint onto the pail to give it a weathered look.


Then I cut out a strip of burlap and applied a heavy layer of Mod Podge to my can and 
placed the burlap onto the Mod Podge.  I then put Mod Podge on top of the burlap and cut two
 different pieces of scrapbook paper to layer on top (doing the same thing with the Mod Podge).  
The pages were thicker and I had to hold them into place to make sure they didn't come up while 
they were drying.  So, this took about 3 minutes per piece.  Not too bad, I didn't think.  
I had my mother-in-law over so we were chatting while I was holding the paper in place!  :-)


When it dried enough to let go, I added a wooden number 7 (because I love the number 7... I actually love most numbers...typography is awesome!)  I got the wooden number from my local craft store.
I applied a heavy amount of Mod Podge and held it in place for another 3 minutes 
while I continued my conversation! Lol!  After it dried enough to let go of, I just let it sit 
for about 10 minutes while I gathered the items I wanted to use to place inside of the pail. 


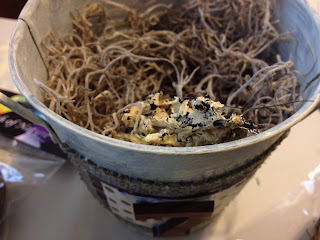
I used spanish moss and put it almost to the top.  Later I went back and added more, 
so I should have just gone all the way to the top with it to begin with.


I added a nest that had little eggs.  I got a few of these at my local craft store because I 
L-O-V-E
to add bird elements to my creations!  
This little nest has some feathers in it, which I adore!


Tim Holtz produces one of my favorite lines of scrapbook and crafting elements.
I have been trying to find a reason to use this!  So, I decided not to waste any of the product, and I cut the little sample number 7 from the package and use it in the nest.  


I also dabble in jewelry making so I had some little elements that I wanted to add.  I had the little corked bottle with a number 97 on it and some seed beads inside that I thought would look cute in the nest, so I used that and a little key charm and a few small buttons.  I also had some of my favorite alphabet twill that I place inside.  Something was still missing.  I needed an element of bling! What could I add?


I found a little spacer that had blue rhinestones.  Perfect!
So, I slid it onto a piece of spanish moss so it wouldn't fall to the bottom.


Here is another view.


I didn't like the twill just "laying there", so I added
a safety pin as another element


Then, I added twine to the top of the pail and added an old button and a 
wooden bead hanging down from the twine.  I knotted the end of the twine so it would stay.


Okay, here it is finished.


Let me know what you think.  I'd love to here from you.

Until next time, be blessed!

:-) Tonya


Thursday, July 12, 2012

...and it begins

I have been surrounded by goals for the last couple of years that have kept me pretty busy.  I have recently begun to see the light at the end of the tunnel as I have been able to check off accomplishments.  It's wonderful what persistence and hard work can do!  I just graduated with my Bachelor's degree and I have gotten my teaching certification for Elementary Education.  


I am so excited about my new career!  Of course, I haven't actually landed a job, yet... but! I have faith that I will.  As I enter this new stage in my life, I had to check one more thing off of my list.  Call me crazy, but I have wanted to start a blog for a while now.  So.... Check!


Here we go on a fabulous journey!


To kick the blog off, I went out today to the local Salvation Army to see if I could find some good deals on things that I could transform...  


I found this (very small) wooden box that is painted a light blue and has pink and white circles painted on the top.  The bottom has pads on it. 


I paid $1 for the box.  I also found a glass jar (maybe a candy jar).  I paid $1 for that, too.


I found a really ugly cute wooden plaque that has a hook on the back for hanging. 


I only paid fifty cents for this.

.....and a yard stick that has an advertisement on it for forty-nine cents.


Oh!  I almost forgot the tin pail for sixty-nine cents! 

Okay..... my plans are to transform these items into attractive decorative pieces.

Check back soon!

:-) Tonya


RETURN TO TOP