Maybe you remember the tin pail that I found at the Salvation Army for $0.69 that I wanted to repurpose. Click here to see that post. Well, here is the finished project and the pictures that will walk you through the process. Hope it inspires you!
First I took out (most of) my supplies (later I decided to add more to it!).
The first thing I did was rub some of my paint onto the pail to give it a weathered look.
Then I cut out a strip of burlap and applied a heavy layer of Mod Podge to my can and
placed the burlap onto the Mod Podge. I then put Mod Podge on top of the burlap and cut two
different pieces of scrapbook paper to layer on top (doing the same thing with the Mod Podge).
The pages were thicker and I had to hold them into place to make sure they didn't come up while
they were drying. So, this took about 3 minutes per piece. Not too bad, I didn't think.
I had my mother-in-law over so we were chatting while I was holding the paper in place! :-)
When it dried enough to let go, I added a wooden number 7 (because I love the number 7... I actually love most numbers...typography is awesome!) I got the wooden number from my local craft store.
I applied a heavy amount of Mod Podge and held it in place for another 3 minutes
while I continued my conversation! Lol! After it dried enough to let go of, I just let it sit
for about 10 minutes while I gathered the items I wanted to use to place inside of the pail.
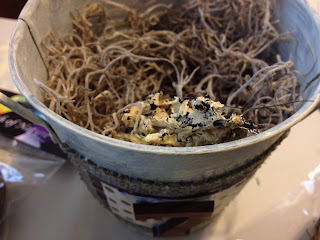
I used spanish moss and put it almost to the top. Later I went back and added more,
so I should have just gone all the way to the top with it to begin with.
I added a nest that had little eggs. I got a few of these at my local craft store because I
L-O-V-E
to add bird elements to my creations!
This little nest has some feathers in it, which I adore!
Tim Holtz produces one of my favorite lines of scrapbook and crafting elements.
I have been trying to find a reason to use this! So, I decided not to waste any of the product, and I cut the little sample number 7 from the package and use it in the nest.
I also dabble in jewelry making so I had some little elements that I wanted to add. I had the little corked bottle with a number 97 on it and some seed beads inside that I thought would look cute in the nest, so I used that and a little key charm and a few small buttons. I also had some of my favorite alphabet twill that I place inside. Something was still missing. I needed an element of bling! What could I add?
I found a little spacer that had blue rhinestones. Perfect!
So, I slid it onto a piece of spanish moss so it wouldn't fall to the bottom.
Here is another view.
I didn't like the twill just "laying there", so I added
a safety pin as another element
Then, I added twine to the top of the pail and added an old button and a
wooden bead hanging down from the twine. I knotted the end of the twine so it would stay.
Okay, here it is finished.
Let me know what you think. I'd love to here from you.
Until next time, be blessed!
:-) Tonya
* P.S. - I linked this post to Simple Home Life and 30 Handmade Days and My Repurposed Life and Primp: Primp Your Stuff Wednesdays and Destination: Craft.


