Showing posts with label decor. Show all posts

Thursday, July 26, 2012

Decorate with Glassware


Okay, I have a small confession to make... I didn't realize how many passions I had 
about certain decorating elements until I began this blog!  I find myself admitting 
to my love of typography, my love of baskets, my love of Tim Holtz's line 
of elements and now I have a new confession!

I love glassware to display items of interest.  

There!  I said it.  Admitting it is the first step to recovery.... but, I'm not altogether sure that I want 
to recover... because it is fabulous and I don't think I need a glassware intervention.

So, due to my newfound discovery, I am going to post some of the 
ways that I incorporate glassware into my decor.  I hope you enjoy 
(maybe I can drag you onto the glassware boat with me!).

This is on a shelf in my living room.  It contains old photographs (Oh, my gosh!  Another passion!)
of my mom and her brother (my Uncle Tom) and her aunt.  I just love the edges of old photos.
I have placed keys, a ceramic ball, a ceramic knob with a clock face printed 
on it, old buttons, an old whistle, a few pretty marbles, some beads, a couple of 
key hole plates, etc. in the bottom.


I don't stop at the jars, I also like to use vases!


This is an old photo of my mother-in-law.  I love the old film 
canister sitting inside of the vase with the photograph.


Okay, here I mix my passion for decorating with glassware with my passion for typography!


I also like to use candle holders in unconventional ways to display..... you guessed it!
Old photographs!  This is a picture of my husband when he was a little boy, 
playing with his grandfather.  He treasures this photo and I thought it 
would be appropriate to display it so he could enjoy it everyday.


Speaking of candle holders, here is another display....


Here is a little secret... I have this displayed high enough that I can get 
away with it.  I couldn't get the photo to stand upright (I didn't want it leaning on 
the glass), so, I used a bit of mounting putty!
Works like a charm!


I could go on because I have several other "glass displays" in our home, 
but I want to stop at this last one because I really do love it.  Maybe it's the 
entire display with the frame and... (yet another passion that I have 
already admitted to you... clothespins... (I may need help!).  :-)


This sits on my bathroom counter in front of my mirror (although I didn't photograph 
it in front of the mirror, for obvious reasons).

Well,  I hope that this helped stir up some creativity with decorating with glassware.

Show off some of those precious items/photos that you have stored away!
Enjoy them everyday! 

Please leave me a comment to let me know what YOU display in glass containers or if you
have any ideas.  I would love to hear from you!

Until next time,

:-)  Tonya


You may also like:
A Jar is More than a Jar  
                          
             Glass Jar Project                               
                                                                                      Glass Block Bird


Friday, July 20, 2012

Altered Pail (Salvation Army Find)

Maybe you remember the tin pail that I found at the Salvation Army for $0.69 that I wanted to repurpose.  Click here to see that post.  Well, here is the finished project and the pictures that will walk you through the process.  Hope it inspires you!


First I took out (most of) my supplies (later I decided to add more to it!).


The first thing I did was rub some of my paint onto the pail to give it a weathered look.


Then I cut out a strip of burlap and applied a heavy layer of Mod Podge to my can and 
placed the burlap onto the Mod Podge.  I then put Mod Podge on top of the burlap and cut two
 different pieces of scrapbook paper to layer on top (doing the same thing with the Mod Podge).  
The pages were thicker and I had to hold them into place to make sure they didn't come up while 
they were drying.  So, this took about 3 minutes per piece.  Not too bad, I didn't think.  
I had my mother-in-law over so we were chatting while I was holding the paper in place!  :-)


When it dried enough to let go, I added a wooden number 7 (because I love the number 7... I actually love most numbers...typography is awesome!)  I got the wooden number from my local craft store.
I applied a heavy amount of Mod Podge and held it in place for another 3 minutes 
while I continued my conversation! Lol!  After it dried enough to let go of, I just let it sit 
for about 10 minutes while I gathered the items I wanted to use to place inside of the pail. 


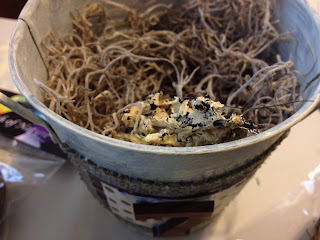
I used spanish moss and put it almost to the top.  Later I went back and added more, 
so I should have just gone all the way to the top with it to begin with.


I added a nest that had little eggs.  I got a few of these at my local craft store because I 
L-O-V-E
to add bird elements to my creations!  
This little nest has some feathers in it, which I adore!


Tim Holtz produces one of my favorite lines of scrapbook and crafting elements.
I have been trying to find a reason to use this!  So, I decided not to waste any of the product, and I cut the little sample number 7 from the package and use it in the nest.  


I also dabble in jewelry making so I had some little elements that I wanted to add.  I had the little corked bottle with a number 97 on it and some seed beads inside that I thought would look cute in the nest, so I used that and a little key charm and a few small buttons.  I also had some of my favorite alphabet twill that I place inside.  Something was still missing.  I needed an element of bling! What could I add?


I found a little spacer that had blue rhinestones.  Perfect!
So, I slid it onto a piece of spanish moss so it wouldn't fall to the bottom.


Here is another view.


I didn't like the twill just "laying there", so I added
a safety pin as another element


Then, I added twine to the top of the pail and added an old button and a 
wooden bead hanging down from the twine.  I knotted the end of the twine so it would stay.


Okay, here it is finished.


Let me know what you think.  I'd love to here from you.

Until next time, be blessed!

:-) Tonya


Wednesday, July 18, 2012

Dry Erase Altered Frame

I am getting in just under the wire to make my post for Wednesday!  I have had a busy day today.  I went to several antique shops and picked up some great little finds (I will post those pictures later).  My son was away for the first half of this summer and he came back today, so I spend some quality time visiting with him.

Anyway, for this post, I decided to take a cheap $5 Wal-Mart frame and see what I could do with it.  I gathered some materials and decided that I would antique the frame and add a piece of scrapbook paper and use the glass as a dry erase board for quick messages.

This thought came to me yesterday when I was erasing a plate that I keep in my kitchen that I use as a dry erase "Menu".   (I will post pictures of that later, too).

Anyway, here are pictures of the process.


I gathered my supplies.  Scrapbook paper for the background, Vaseline (any petroleum jelly should do) and Q-tips for dabbing the frame in certain areas, paint, my handy-dandy paper cutter, twine, embellishments, a paint brush and a sponge brush.


First, I took the glass and the paper out of the frame.  I don't mind if the paint gets on the inside of the frame that no one will see, but I didn't want it on the glass.  I also used the paper inside of the frame to cut the scrapbook paper to the right size.  


I daubed the Vaseline on the frame very strategically in spots where I thought the paint would have chipped if it really was an antique frame.  Then I applied the paint DIRECTLY to my sponge....not to the frame itself, and I daubed the sponge onto the frame (do not wipe it, you will smear the Vaseline).

I put a good coat on and then I waited for it to dry.


If the paint didn't cover some of the cracks, I thought that 
was okay, because it only added to the charm.


After the paint dried, I used a paper towel to GENTLY wipe the frame.  
The areas with the Vaseline underneath the paint wiped off, leaving behind the
frame.  It looks like the paint actually chipped off.


I wiped a line of the Vaseline down the frame on each side, so you can see where the 
dark lines are on the frames (making it look like it was more dimensional).

The frame I got had a little gold on it and I didn't want the gold to show through (because I wanted it to look like a wooden frame), so I used a second color to touch up some of the areas that had gold showing through.  I touched the frame with the blue and then just wiped it a little so it would stand out too much.


I used a small paintbrush so I could control the paint better.


You can see where I added the blue to this corner.

Here is the frame after all of the blue has been added.


It looked a little plain, so I added a little embellishment across the top.


Here it is with the embellishment.


Tell me what you think.

Hope you enjoyed this post.

Maybe it will inspire you.

Until next time, be blessed.

:-) Tonya

* P.S. - I linked this post up to House of Hepworths #108 and The Shabby Nest 


Tuesday, July 17, 2012

Chalkboard Decor

Today's post is about the refinishing of a chalkboard craft that I did almost 2 years ago.  When my husband and I got married, we had the song, "Everything" by Michael Buble' at our Reception.  It was one of our favorite songs.  In an effort to keep that romance alive, I took an old picture that I was planning to put in a yard sale and turned it into a chalkboard and wrote some of the lines of the song on the chalkboard.

I put about 3 coats of Rust-Oleum chalkboard paint on the glass (letting it dry in between each coat).


While the glass was out of the frame, I painted the actual frame and rubbed the paint on to give it an aged look.  I wiped paint off in areas so I could see the frame (to make it look like it was chipping off).


After the frame and the glass dried, I put it back together and used real chalk to write on the board.

The problem with using real chalk if you hang your chalkboard in the bathroom, is the steam from the shower.  I happened to hang my piece in the bathroom.  It continued to fade and I would have to retouch it over and over.


Finally, I decided that I would make the "chalk" permanent.  I went to my local craft store to find a chalk pen.  They didn't have one, but they did have a Terra Cotta pen that I thought I could use as a great substitute.


I thought this would work out, but it took forever!!!  I had to keep "pumping" the pen and wiping it off (probably because I had to write on top of the chalk and it was getting "gunked up").


You can see here how I couldn't do one full letter without stopping.


Here is a picture of it halfway completed so you can see the difference.


Here it is completed.  Now when I hang it back up in the bathroom, it shouldn't fade.
No more retouches (hopefully)!


Hope you are inspired to make a "romantic" 
piece of "art" to hang up!

Until next time, be blessed!

:-) Tonya


* P.S. - I linked this post to The Winthrop Chronicles.


RETURN TO TOP