Saturday, August 25, 2012

Classroom Photos

Here are some photos of my classroom showing "BEFORE" and "AFTER".  I have
actually done some more rearranging and updating since these photos were taken, but
not too drastic.  I will show more updates later.  You can also see in some of these
pictures that I incorporated some of my projects from older posts into the classroom.

For example, the hand-stitched bird has a name now (Mrs. Pipper) and she is our class
mascot.  She sits above the classroom on a shelf "watching" to make sure that we are
all quiet.  I leave notes for the classroom from Mrs. Pipper when they are behaving and
they get to add an egg to our jar. The jar is just a cookie jar with a metal lid (WalMart).

They love getting notes.  The notes are clipped to the birdhouse that I made from a book
in another previous post.  I have also placed the glass candy jar makeover that has the
flash card "nest" inside .... from another previous post.  Most of my projects came in handy
for decorating the room!

Here are the pics of how the room turned out.  Hope you enjoy it.


This little bird and nest is hanging in my pom-pom tree!
The students love the nest and egg.


This is a picture of the room BEFORE I added my tree and 
changed this corner to my Reading Birds/ Writing Center.


Hope you enjoyed it!

Until next time, be blessed!

:-) Tonya

Wednesday, August 22, 2012

Sneak Peek- Classroom Before & After

I haven't had a minute to spare since school began!  I took some photos before I redecorated
and cleaned up the old classroom that I was assigned and turned it into my own room.

I am posting a few before and after shots sneak peeks!  I will make the photos look
more professional sometime this weekend, but I wanted to show a few tonight.

Hope you enjoy!

Here is the sign I made for the entrance of my classroom.

Here is a BEFORE of my cabinet area.

Here is the AFTER of the same area.


Here is a BEFORE of the corner area by the door.

Another BEFORE pic...


Same area.... AFTER pic.

Another AFTER pic....

Okay.... more to come.

Until next time, be blessed!

:-) Tonya


Friday, August 17, 2012

New Classroom!

I have not made a post recently because I have accepted a position as Kindergarten
teacher!  I cannot tell you how blessed I am.  I am so excited.  I have been cleaning
and preparing my new room.  Last night we had open house and I got to meet most
of my new students.  School begins on Monday here so, I have been hustling to get
everything accomplished in time.  I have taken some "Before" pics of my new room
and I will take after pics when I am completed (should be today).  I will get those to
the blog as soon as I can so you can see the dramatic change!  

Until next time,  be blessed!

:-) Tonya

Monday, August 13, 2012

DIY Cloche

Okay, if you have read any of my previous posts, you probably 
saw that I {L O V E} to decorate using glassware.
I have been looking for a cloche for a while now 
and I cannot seem to find one.

While I was out thrifting a few weeks ago, I picked up several 
glasses that are the perfect shape for creating my own cloche.

...just turn the glasses over and viola!  Well, almost viola!

These glasses have a flat bottom.  They also have a thick area of
glass in the bottom (which will become my top).

....but we all know how I love a challenge!  ;-)

So, I thought about all of the different opportunities that lie
ahead in creating some really pretty cloches from these glasses.

Today, I will show you the first in what will soon be a series.

My first medium for the handle of the cloche is polymer clay.
My mom is very crafty with this stuff, so I thought I would give it a try.

Here are the pics and the process.


You can see the thick bottom on the glass.  I rounded up some jump rings,
rhinestones and a few other jewelry making pieces along with my clay.


Make sure it fits before you bake it.  Once it bakes, there is 
no turning back.  


After making your perfect little jewel to top the jar, you are ready to bake.  See the baking 
instructions on the package of clay.... and be careful when it comes out!  Let it cool before you
pick it up.   Also, remove the rhinestones before you bake it.  
The heat will make the rhinestones turn a cloudy color (which will remove the "bling" effect)!

-Don't ask me how I know this, but replacing the rhinestones is not fun!-


You can't really tell because of the angle of the picture, but I slid a pin down the center of
the bead/ball so that I could add a glass bead on top...(you'll see).

In between the lovely rain, I took my new cloche top outside to
spray paint with silver paint.  You can see the raindrops on the 
inside of my container, proving that I wasn't as quick between the showers 
as I'd liked to have been!  


(You can see the pin here... and the glass bead I am adding).

I had to use super glue to replace all of the dulled rhinestones.

Live and learn!

I also learned that because of the thickness on the bottom of this glass, 
there was a reflection of the bottom of the "cloche top".  So, I printed a 
picture of a bird and glued it to the bottom of the glass and then I glued 
the cloche top to the picture.  

It actually was an accident, but I {L O V E} it.  

This is a view looking into the glass.


See in this next picture how it looks like there are three layers?

1.) The bottom of the cloche (filled with my pretty beads and keys, and
shredded music, etc).  

2.) The reflection of the bird 

3.)  The cloche top made from clay.


So, here we have the first in a series of homemade cloches.  
I can hardly wait to fill them with more of my treasures and display them!

I may try using a lamp finial next time as the cloche top. :-)


I hope this inspires you to create things that you love.

Please leave a comment and let me know what you think.
I {L O V E} comments.

I'd also {L O V E} for you to follow me via Google Friend if you like
what you see in my blog posts.

While you are here, check out my older posts!

Until next time, be blessed!

:-)  Tonya

I'm linking this post to the following link parties:


Friday, August 10, 2012

Altered Notepad Frame

Nap Time CreationsWhew!  It has really been raining lately!  I have had this project planned, but
needed to wait for the rain to stop so I could spray paint.  Today, the sun was
out and I grabbed my frame and spray paint box and ran outside.  I sprayed
my frame and came back inside to set up the rest of the project.  After about 
20 minutes, I decided to see if the frame was dry.... wouldn't you know it...
the sun was shining and it was raining!  That's Florida weather for you!

Anyway, my frame had dried enough that the rain didn't ruin it.  I grabbed it
quickly and came inside to start this long awaited project.

Here are the pics and how I did it.


I sprayed my frame white and rescued it from the rain!  Then after it dried, I
applied a layer of Mod Podge so the paint would look thicker (and older) 
when I sanded it.  Then when it was nearly dry, I applied a heavy layer
of acrylic paint.  I don't know why I am on a kick for turquoise right now.


I sanded down the frame outside (after it stopped raining).


Then I applied a layer of Mod Podge to the back of the frame and laid the burlap 
on top.  I applied more Mod Podge on top of the burlap and two pieces of ribbon.


Okay.... I have to give you a warning here!

To apply this cute little nest with eggs (that I found on sale at Target),
I decided to use super glue.  Do NOT use super glue!   It is not heavy
enough and you will end up using a different adhesive anyway.

In MY particular case, I used a hot glue gun.... thereby HEATING 
the super glue, which in turn created horrible fumes 
that burned my nose and throat (for hours!).  

Consider yourself warned!  


I created this cute little notepad on Adobe Photoshop.
(Have I mentioned that I {L O V E} Adobe Photoshop?

I typed the word "Nest" and the definition at the bottom and I found
this little bird picture when I searched bird clipart.


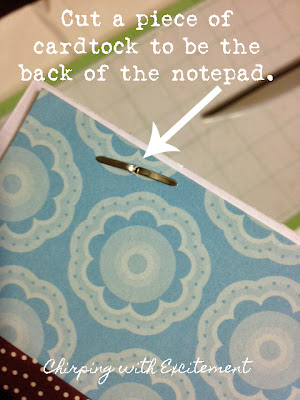
To make the notepad, I printed the paper I wanted in the pad and then 
used two brads on each side of the notepad.  I cut a piece of card stock 
(I used a piece with a print so you would be able to see it better) to use as
the back of the notepad.  Cut the card stock slightly smaller than the
size of the notepad.  You can see how I did that.

(...and I misspelled card stock on my photo... oh, the horrors!)


This part is a little tricky.  I hope I can explain it well enough.
I took a piece of twine and wrapped it around the back of the frame (the part
to which the burlap is Mod Podged).  Then, I hot glued it to the back.
In other words, if I flipped this frame around and you saw the back
of it, you would see the twine and the hot glue. . . (the ugly truth!)


I did that so that I would be able to slip the back of the notepad behind the twine so it would 
stay until I need to add more paper to my note pad.  At that point, I could easily 
remove it and add more paper to the brads and then replace it again.


Check it out!  I added a clothespin! Imagine that.... me... using a clothespin!  :-)
I hot glued the clothespin to the burlap so I could change the 
monthly calendar out when the month changes.


I also created this little calendar on Adobe Photoshop.
I used the same background on the calendar that I used on 
the notepad.  This way they coordinate! :-)


Here is the finished project.


I hope you enjoyed this project.  Maybe it will inspire you to 
create your own notepad and calendar frame.  

I'm hoping to hang this in my classroom (when I get one)!  

If you have a minute, I would {L O V E} for you to let me know what you think.
I love comments!  I'd also {L O V E} for you to follow my blog via Google Friend.

Until next time, be blessed!

:-)  Tonya

While you're here, check out my older posts.....


Linking to these parties...


Monday, August 6, 2012

Painted Mason Jar Vase

House of HepworthsFirst, I have to tell you how {EXCITED} I am!  Two of my posts were featured 
this past week.... this was my first time being featured since I started this blog 3 weeks ago!

Now, it's time for today's post. .......

This project presents many opportunities!  

~ It can be a simple vase sitting alone (mine is on my bathroom countertop).
 ~ It could be used as table markers at a wedding (or party).  
~ It could be used as a centerpiece.
 ~  Etc. (Leave your comments and tell me what YOUR ideas are....)


 Let's get started on the pics and how I did it.

First, I made spaghetti!  :-)  LOL! 
I needed an empty Mason jar and this one looked good... so my family 
had to participate by eating spaghetti!  (Not a problem, I doctor the jar sauce 
up so much that you can't even tell it's from a jar!)

I took my cleaned jar and some white and silver spray paint with my "spray paint box"
and headed outside to give the jar a coat of silver paint.   


I turned the jar upside down before I sprayed it.  
After the silver paint dried, I sprayed it with white paint.


Once the white paint dried, I scratched the 
paint to rough it up and make it look old.  


I had a small problem, when I noticed the expiration 
date was showing.  I could have painted over it, but 
I like a challenge!  So I decided to bring this project 
to a whole other level.   


So..... I grabbed my twine, burlap, some acrylic paint, 
chalkboard paint, chalk and super glue.  (This is
why these supplies are pictured separately above).


After I wrapped the twine around the neck of the jar, I used 
super glue to adhere the twine to the burlap tag.
(Ya gotta love super glue!)


I am blessed to have a hydrangeas in my yard... (my favorite flower)!
So, I just went outside and cut some fresh flowers to display in the jar.

Here is a close up pic of the jar and the bottom of the burlap tag so
that you could see the color coming through the burlap.  It is subtle,
but you can still see it.  I think it adds a vintage, shabby chic feel to it.


My one hydrangea bush produces a variety of colors.
It is pretty {FABULOUS}
I chose different shades to display in this jar.


So, now it is YOUR turn to decide......


I hope this inspired you to recycle common items that you may have 
at your disposal and make them into beautiful items that you can
use to decorate with or maybe give away as a gift!

Please leave a comment and let me know what you think!

Also, I would {L O V E} for you to join my site if you have
just a minute.  You could also follow me by email if you'd like. 

Until next time, be blessed!

:-)  Tonya


Linking this post to these parties...

RETURN TO TOP