
Nap Time CreationsWhew! It has really been raining lately! I have had this project planned, but
needed to wait for the rain to stop so I could spray paint. Today, the sun was
out and I grabbed my frame and spray paint box and ran outside. I sprayed
my frame and came back inside to set up the rest of the project. After about
20 minutes, I decided to see if the frame was dry.... wouldn't you know it...
the sun was shining and it was raining! That's Florida weather for you!
Anyway, my frame had dried enough that the rain didn't ruin it. I grabbed it
quickly and came inside to start this long awaited project.
Here are the pics and how I did it.


I sprayed my frame white and rescued it from the rain! Then after it dried, I
applied a layer of Mod Podge so the paint would look thicker (and older)
when I sanded it. Then when it was nearly dry, I applied a heavy layer
of acrylic paint. I don't know why I am on a kick for turquoise right now.

I sanded down the frame outside (after it stopped raining).


Then I applied a layer of Mod Podge to the back of the frame and laid the burlap
on top. I applied more Mod Podge on top of the burlap and two pieces of ribbon.

Okay.... I have to give you a warning here!
To apply this cute little nest with eggs (that I found on sale at Target),
I decided to use super glue. Do NOT use super glue! It is not heavy
enough and you will end up using a different adhesive anyway.
In MY particular case, I used a hot glue gun.... thereby HEATING
the super glue, which in turn created horrible fumes
that burned my nose and throat (for hours!).
Consider yourself warned!

I created this cute little notepad on Adobe Photoshop.
(Have I mentioned that I {L O V E} Adobe Photoshop?
I typed the word "Nest" and the definition at the bottom and I found
this little bird picture when I searched bird clipart.

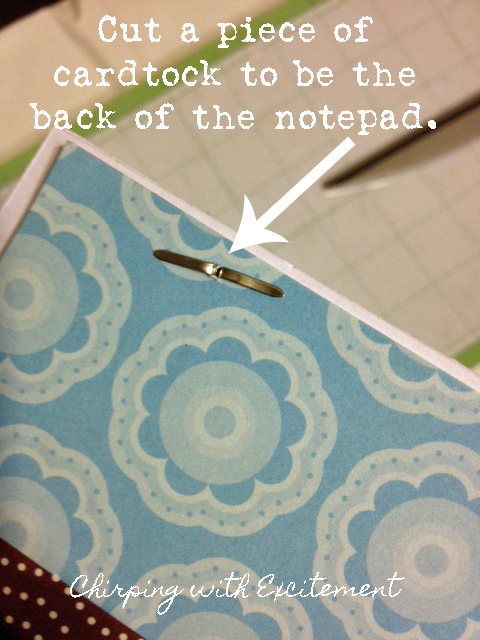
To make the notepad, I printed the paper I wanted in the pad and then
used two brads on each side of the notepad. I cut a piece of card stock
(I used a piece with a print so you would be able to see it better) to use as
the back of the notepad. Cut the card stock slightly smaller than the
size of the notepad. You can see how I did that.
(...and I misspelled card stock on my photo... oh, the horrors!)
This part is a little tricky. I hope I can explain it well enough.
I took a piece of twine and wrapped it around the back of the frame (the part
to which the burlap is Mod Podged). Then, I hot glued it to the back.
In other words, if I flipped this frame around and you saw the back
of it, you would see the twine and the hot glue. . . (the ugly truth!)

I did that so that I would be able to slip the back of the notepad behind the twine so it would
stay until I need to add more paper to my note pad. At that point, I could easily
remove it and add more paper to the brads and then replace it again.

Check it out! I added a clothespin! Imagine that.... me... using a clothespin! :-)
I hot glued the clothespin to the burlap so I could change the
monthly calendar out when the month changes.

I also created this little calendar on Adobe Photoshop.
I used the same background on the calendar that I used on
the notepad. This way they coordinate! :-)

Here is the finished project.

I hope you enjoyed this project. Maybe it will inspire you to
create your own notepad and calendar frame.
I'm hoping to hang this in my classroom (when I get one)!
If you have a minute, I would {L O V E} for you to let me know what you think.
I love comments! I'd also {L O V E} for you to follow my blog via Google Friend.
Until next time, be blessed!
:-) Tonya
While you're here, check out my older posts.....
Linking to these parties...
This is such a fun idea! I just came over for a visit and decided to stay. Thank you so much for being my newest follower! I'm excited to be yours! :)
ReplyDeleteThanks, Jess! :-)
DeleteI'm a nut for turquoise too! Thank you for stopping by for a visit Tonya! I returned the follow :-) I hope to see you at my Tuesday link party! I 'd love to see what you have to share and I am sure many others will too! Have a terrific weekend! I replied to your email but I see you have it set for no-reply comment so I'm pretty sure you didn't get it :-(
ReplyDeleteI hope I fixed my email.... I plan to visit and participate in your Tuesday link party! Thanks! :-)
DeleteGreat Tutorial! I love the colors you picked, it turned out so nice. Thanks for stopping by my blog. I am glad to be a new follower!
ReplyDeleteThanks so much, Paula! Glad to be your blog friend! :-)
Deletewhat a great project! so cute
ReplyDeleteThanks for the compliment and for stopping by, Heather! I hope to see you again! :-) Tonya
DeleteA very nice tutorial and so cute! I really like your blog, I'm your new follower.
ReplyDeleteI'm excited that we are "bloggy friends"! :-) Thanks so much!
DeleteCame over from Twigg's. This is such a great and decorative addition to a classroom. The turquoise really pops. I often use card tock myself! LOL!
ReplyDeleteGreat information!
Distressed Donna Down Home
Donna - I couldn't believe I misspelled that! It was too late once I noticed it.... LOL! ;-)
DeleteThanks for the compliment! :-)
Tonya, this project is adorable. You did an awesome job. Thanks so much for stopping by posedperfection.blogspot.com and leaving me a sweet note about the Simple Burlap Candle Holder. And thanks for following me. I'm now following you too. I hope you'll stop by again and visit soon. Have a blessed week!
ReplyDelete~Nici
Thanks, Nici! :-)
DeleteStopping by from Nifty Thrifty! This is adorable, love the color, burlap and lace. I like to use cardstock myself! Beautiful!!! My fingers are crossed you’ll share your creative inspiration tonight with Sunday’s Best – sharing is a good thing!
ReplyDeleteThanks, Cathy. I linked up to your party! Sharing IS a good thing! :-)
DeleteJust tickled you share you notepad with us. I just adore this, and so love the color. I am following you on GFC to keep in touch! Thanks for sharing your creative inspiration with Sunday’s Best – it helped to make make the party a success!
ReplyDeleteCathy - Thanks so much! :-) I am following you now, too!
ReplyDeleteThanks a million! I would be happy to link it to your party. Thanks for hosting it! :-)
ReplyDelete