
Okay, if you have read any of my previous posts, you probably
saw that I {L O V E} to decorate using glassware.
I have been looking for a cloche for a while now
and I cannot seem to find one.
While I was out thrifting a few weeks ago, I picked up several
glasses that are the perfect shape for creating my own cloche.
...just turn the glasses over and viola! Well, almost viola!
These glasses have a flat bottom. They also have a thick area of
glass in the bottom (which will become my top).
....but we all know how I love a challenge! ;-)
So, I thought about all of the different opportunities that lie
ahead in creating some really pretty cloches from these glasses.
Today, I will show you the first in what will soon be a series.
My first medium for the handle of the cloche is polymer clay.
My mom is very crafty with this stuff, so I thought I would give it a try.
Here are the pics and the process.

You can see the thick bottom on the glass. I rounded up some jump rings,
rhinestones and a few other jewelry making pieces along with my clay.

Make sure it fits before you bake it. Once it bakes, there is
no turning back.

After making your perfect little jewel to top the jar, you are ready to bake. See the baking
instructions on the package of clay.... and be careful when it comes out! Let it cool before you
pick it up. Also, remove the rhinestones before you bake it.
The heat will make the rhinestones turn a cloudy color (which will remove the "bling" effect)!
-Don't ask me how I know this, but replacing the rhinestones is not fun!-

You can't really tell because of the angle of the picture, but I slid a pin down the center of
the bead/ball so that I could add a glass bead on top...(you'll see).
In between the lovely rain, I took my new cloche top outside to
spray paint with silver paint. You can see the raindrops on the
inside of my container, proving that I wasn't as quick between the showers
as I'd liked to have been!


(You can see the pin here... and the glass bead I am adding).
I had to use super glue to replace all of the dulled rhinestones.
Live and learn!
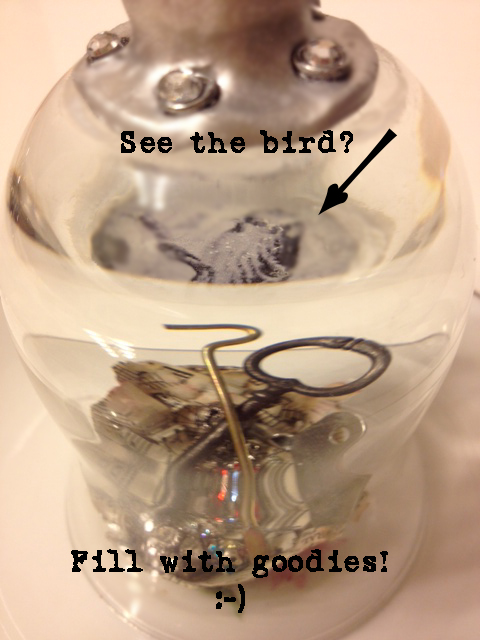
I also learned that because of the thickness on the bottom of this glass,
there was a reflection of the bottom of the "cloche top". So, I printed a
picture of a bird and glued it to the bottom of the glass and then I glued
the cloche top to the picture.
It actually was an accident, but I {L O V E} it.
This is a view looking into the glass.

See in this next picture how it looks like there are three layers?
1.) The bottom of the cloche (filled with my pretty beads and keys, and
shredded music, etc).
2.) The reflection of the bird
3.) The cloche top made from clay.
So, here we have the first in a series of homemade cloches.
I can hardly wait to fill them with more of my treasures and display them!
I may try using a lamp finial next time as the cloche top. :-)

I hope this inspires you to create things that you love.
Please leave a comment and let me know what you think.
I {L O V E} comments.
I'd also {L O V E} for you to follow me via Google Friend if you like
what you see in my blog posts.
While you are here, check out my older posts!
Until next time, be blessed!
:-) Tonya
I'm linking this post to the following link parties:
Loving all your projects. You are one talented lady!
ReplyDeleteThanks, Jan! I really do appreciate it. :-) Have a great day!
DeleteI'm amazed by this project - completely amazed - awesome job!
ReplyDeleteI'm your newest follower - would love to have you come by for
a visit and follow back when you have the time :)
Hugs,
Suzan
Suzan, I am happy to follow your blog! :-)
DeleteVery Cool Project! Found you at Coastal Charm's Linky Party. Love it!
ReplyDeleteThanks, Jeannie! I'm so glad you enjoyed it! :-)
DeleteBeautiful. Love the placement of the bird print.
ReplyDeleteThanks, Cheryl. I love happy accidents! :-)
DeleteReally cool. Love the bird theme! Thanks for sharing at the All Star Block Party.
ReplyDeleteThanks, Heather! :-)
DeleteI love it! Thanks for sharing!
ReplyDeleteHolly
Thanks, Holly! :-)
DeleteHow unique! I love how you added the bird, so adorable!
ReplyDeleteSaw you sharing at Adventures of a DIY Mom and I'm now following you.
Debbie :)
Thanks, Debbie! I hopped over to your site and I am now following you as well! :-) TOnya
DeleteThis post is full of clever ideas. I love how you put the picture of the bird in the glass. I'm following you now so I don't miss another great idea.
ReplyDeleteLove your site!! Following from House of Helton at www.aleahhelton.blogspot.com
ReplyDeletewww.facebook.com/houseofhelton
Just found your blog and am your newest follower-cute projects! I'd love you to visit and say hi :)
ReplyDeleteSusan
100% artsy! Great. Thank you for linking it up at our linky party athttp://www.fineCraftGuild.com
ReplyDeleteWhat a great idea. I'm off to raid my cupboard and see if I have any glass to give a makeover too.
ReplyDeletewhat a clever idea, love it! totally one of a kind, I'm all for that! great job :)
ReplyDelete