Showing posts with label home decor. Show all posts

Friday, July 20, 2012

Altered Pail (Salvation Army Find)

Maybe you remember the tin pail that I found at the Salvation Army for $0.69 that I wanted to repurpose.  Click here to see that post.  Well, here is the finished project and the pictures that will walk you through the process.  Hope it inspires you!


First I took out (most of) my supplies (later I decided to add more to it!).


The first thing I did was rub some of my paint onto the pail to give it a weathered look.


Then I cut out a strip of burlap and applied a heavy layer of Mod Podge to my can and 
placed the burlap onto the Mod Podge.  I then put Mod Podge on top of the burlap and cut two
 different pieces of scrapbook paper to layer on top (doing the same thing with the Mod Podge).  
The pages were thicker and I had to hold them into place to make sure they didn't come up while 
they were drying.  So, this took about 3 minutes per piece.  Not too bad, I didn't think.  
I had my mother-in-law over so we were chatting while I was holding the paper in place!  :-)


When it dried enough to let go, I added a wooden number 7 (because I love the number 7... I actually love most numbers...typography is awesome!)  I got the wooden number from my local craft store.
I applied a heavy amount of Mod Podge and held it in place for another 3 minutes 
while I continued my conversation! Lol!  After it dried enough to let go of, I just let it sit 
for about 10 minutes while I gathered the items I wanted to use to place inside of the pail. 


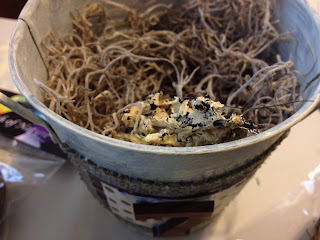
I used spanish moss and put it almost to the top.  Later I went back and added more, 
so I should have just gone all the way to the top with it to begin with.


I added a nest that had little eggs.  I got a few of these at my local craft store because I 
L-O-V-E
to add bird elements to my creations!  
This little nest has some feathers in it, which I adore!


Tim Holtz produces one of my favorite lines of scrapbook and crafting elements.
I have been trying to find a reason to use this!  So, I decided not to waste any of the product, and I cut the little sample number 7 from the package and use it in the nest.  


I also dabble in jewelry making so I had some little elements that I wanted to add.  I had the little corked bottle with a number 97 on it and some seed beads inside that I thought would look cute in the nest, so I used that and a little key charm and a few small buttons.  I also had some of my favorite alphabet twill that I place inside.  Something was still missing.  I needed an element of bling! What could I add?


I found a little spacer that had blue rhinestones.  Perfect!
So, I slid it onto a piece of spanish moss so it wouldn't fall to the bottom.


Here is another view.


I didn't like the twill just "laying there", so I added
a safety pin as another element


Then, I added twine to the top of the pail and added an old button and a 
wooden bead hanging down from the twine.  I knotted the end of the twine so it would stay.


Okay, here it is finished.


Let me know what you think.  I'd love to here from you.

Until next time, be blessed!

:-) Tonya


Monday, July 16, 2012

Game Themed Entryway

Whew! It has been a busy day!  I started trying to work on some of the Salvation Army finds, but I cannot locate a very special element that I want to add to one of the projects.  I finally had to set that idea to the side and work on something else (other than supper and cleaning house... which I am doing in between projects)!  So, I decided that I would show you some of my favorites as far as my own home decor goes.

Welcome to my hallway!   My family loves to laugh and play.  We have game night at least twice per month.  It is a great family bonding activity, so if you have teenagers or pre-teens, I would like to encourage you to break out your games (make sure they are games that they like) and enjoy family time.

I created this because .... well, because it keeps the games handy ... and because I love the way it looks.
I hope you enjoy it and get some ideas for yourself.  Let me know what you think!


In each of these old Ball jars, I have placed game pieces.  In one jar I have marbles, in another Scrabble pieces and in another chess pieces.  You can see the checker board standing up behind the jars.  I couldn't resist using Scrabble letters to spell out "Game Time".  There is also a minute timer, which is used in most games we play.  


I have to admit, I have a love for numbers and letters, so the Scrabble card lent itself well to my theme and the letter "D" was perfect!  We have 3 kids, so I chose the "3" Uno card (and yellow matched the best).
You can see the dominos laying on the table in front of the cards.


Of course, no game is complete without the tally.  Not that it matters to me, I am really not competitive!
The wire basket holds old pool balls that I found at an antique store and old wooden block letters.  Each of the blocks has our initial on it.  I love the number 7, so I had to get that pool ball!   My son was with me when I purchased them and he loves the number 14, so we got that one.  And the yellow ball was to bring the letter "H" out (otherwise, it would have been the only yellow element in the basket). 


I adore this glass "Tic-Tac-Toe" frame.  I have pictures of my husband and myself in the frame with cute little sayings.  Then I used the glass pieces, (the "X" and "O" 's) on a few pictures and leave the rest on the table to make it look like there is a game in progress!  


I used cute scrapbook paper with chipboard arrows pointing at the photos.


That's the top of the table.  The underneath of the table has a collection of games we love to play (with a few decorative items, like the old football and coach's whistle and the large wooden dice that my sister gave me for Christmas. 


Oh, I forgot to tell you about my old Backgammon set.  
I think it adds a nice touch with the case.

And... I love wire baskets (actually I love almost any kind of basket),
but this wire basket does a nice job of keeping the games organized 
and neat... and the basket looks nice, too. 


This is how it looks down the hall.


I love the pictures on the wall.  I especially love the Bingo card.  I put it
in an oval frame and the Bingo card is sideways.  At first I was going to 
hang it right side up, but it just looked good hanging sideways... kind of quirky!


I also, put one of my all time favorite quotes on the wall that I typed
onto pretty paper and framed.  The quote is by Shel Silverstein.  It is perfect for teaching 
your children that they can accomplish anything that they put their mind to doing.  


 I needed a piece that had typography on it.  I painted this myself
to match what I wanted.  It took a long time because I had to let layers dry in between painting.


It's not perfect, but it's what I wanted.

Finally, I put an old postcard and a skeleton key in a frame and placed it beside another quote that I framed, "Bless this home with laughter and love".  I thought that was quite appropriate! 


So, there it is.  A sneak peek into my home....down my hallway.

I hope you enjoyed it and got some ideas to use for yourself!

Until next time, be blessed!

:-)  Tonya

* P.S. - I linked this post up to Vintage Wanna Bee and Creations by Kara.


RETURN TO TOP